
Building a Reasoning LLM in Google Colab
A comprehensive guide for product managers on how to get started with DeepSeek


Traditional AI responses often miss crucial nuances, providing only surface-level answers to complex questions. Reasoning models represent a major advance by employing step-by-step logical processes instead of simple pattern matching. This guide demonstrates how product teams can implement and customize DeepSeek R1 reasoning models in Google Colab to achieve more thorough, transparent AI analysis without requiring specialized infrastructure.
This article explores the technical framework behind reasoning enhancement through what we call "forced extended thinking" – a technique that prevents language models from rushing to conclusions. You'll learn how to use token monitoring, depth enforcement, and prompt injection to create AI systems that think more deeply about product challenges.
For product teams, these capabilities translate into tangible outcomes: more thorough exploration of alternatives, better risk identification, and structured analytical frameworks. By customizing thinking depth to match problem complexity, you can apply appropriate analytical rigor to different decision types – from quick feature assessments to comprehensive strategy evaluation.
The guide covers:
Understanding reasoning models and their business impact
Setting up the Google Colab environment with essential libraries
Building a modular infrastructure with ModelManager class
Implementing the core reasoning enhancement functions
Configuring parameters for different thinking styles
Creating an interactive interface with Gradio
Note: I recommend you read this article alongside the related Colab notebook where the codes are available. This will help you understand the topic better. Link to the notebook here.
Understanding the problem domain and business impact
Have you ever noticed how standard AI responses sometimes feel shallow and miss crucial nuances? Well, reasoning models are changing that. They represent a significant advance in how AI approaches complex problems.
Reasoning models employ a step-by-step logical process instead of simple pattern matching. They show their work by generating intermediate steps before reaching conclusions. This makes their decision process transparent and interpretable – much like how humans solve problems.
So, what makes these models different from traditional LLMs?
Thought process visibility: They expose their reasoning chain, allowing you to see how they arrive at conclusions
Self-correction capability: They can identify and fix logical errors mid-analysis
Reduced hallucinations: By following logical steps, they produce fewer plausible-but-wrong answers
Direct business benefits
Reasoning models transform how teams approach product decisions through:
More thorough exploration of product alternatives, considering user needs, market conditions, and technical constraints simultaneously
Better risk identification by systematically examining edge cases and potential pitfalls
Structured analytical frameworks that balance business metrics with user experience concerns
When applied to product development, these models help teams break free from confirmation bias and cognitive shortcuts. They force consideration of multiple dimensions before reaching conclusions.
The enhanced "thinking" mechanism in models like DeepSeek R1 produces analysis that's notably more comprehensive than standard AI responses. This translates to better-informed decisions and reduced likelihood of costly product missteps.
By customizing the thinking depth to match problem complexity, teams can apply appropriate analytical rigor to various decision types.
The business impact is straightforward: better decisions lead to better products and improved market outcomes.
Environment setup: Google Colab and library overview
So, why Google Colab for building reasoning models? Well, it's actually perfect for this kind of project. Colab gives you access to free GPU resources, making it ideal for running resource-intensive language models without investing in expensive hardware. Plus, its notebook format lets you mix code, explanations, and outputs in one sharable document.
Let's break down the essential libraries we're using:
Foundation libraries:
torch (PyTorch): Powers the neural network operations needed for language model processing
huggingface_hub: Connects to model repositories to download pre-trained models
gc & sys: Handle memory management and system operations—critical when working with large models
os: Manages file operations and environment variables
User interface components:
gradio: Creates interactive web interfaces for AI applications with minimal code
gradio_log: Displays real-time logs during model loading and operation
Specialized tools:
unsloth: Optimizes language models for faster inference and reduced memory usage—essential for running large models on limited hardware
Here's a simplified view of how these components work together:
# Basic setup flow

install_required_libraries() # uv, unsloth, gradio

authenticate_with_huggingface() # Access models

initialize_model_manager() # Create management infrastructure

setup_user_interface() # Build interactive UI with gradio
The unsloth library deserves special mention. It patches PyTorch to enable faster processing—basically giving you 2x faster operation when working with large language models. Without it, running reasoning models like DeepSeek R1 on Colab might be impractically slow.
These libraries form a complete stack: model access, optimization, memory management, and user interaction. Each plays a specific role in creating a working environment for reasoning models.
Just note that the authentication step is important—you'll need a Hugging Face token stored in your Colab secrets for secure model access.
Let me tell you how you can set it up.
Login to the Huggingface platform.
Click on your avatar on the top right and find “Access Tokens” to navigate into it. You can visit the webpage with this link as well.

Click on “Create new token”

Then, you will need to write the token's name, and as shown in the image below, just select all the checkboxes. This will allow you to access the model from the Hugging Face API.

Scroll down and click on “Create token” and the token will be created.

Copy the token id displayed in the token card and save it elsewhere.


“Save your token value somewhere safe. You will not be able to see it again after you close this modal. If you lose it, you’ll have to create a new one.”
Now, open your Colab notebook and click on the key icon in the left sidebar (🔑)

Click "Add new secret."
Enter "HF_TOKEN" as the name
Enter your actual Hugging Face token (that you saved) as the value
Click "Save," and you are good to go.

Notebook structure and overall organization
Let's take a closer look at how this notebook is organized. The structure follows a logical progression that makes it easy to understand and modify for your own projects.
The notebook uses a modular, component-based approach with clear separation of concerns. Here's the high-level organization:
Environment preparation (First three cells)
Library installation via uv (a faster pip alternative)
Basic imports for core functionality
Authentication with Hugging Face
Core infrastructure (Middle section)
The ModelManager class – This is basically the heart of the notebook
Configuration parameters for controlling reasoning behavior
Helper functions for model loading and generation
User interface layer (Final section)
Gradio interface components
Event handling for user interactions
Application launch code
What's really nice about this structure is how it separates different concerns. The ModelManager handles all the technical complexity of working with language models, while the UI components focus solely on user interaction.
The notebook follows a bottom-up design pattern: first building fundamental components, then combining them into more complex systems. This approach makes the code more maintainable and easier to adapt.
Each section builds on the previous ones in a logical way:
Environment setup → enables model loading
Model management → enables reasoning capabilities
Configuration parameters → enables customization
UI components → enables human interaction
I particularly like how the ModelManager encapsulates all model operations. This means if you want to swap out DeepSeek R1 for another model from Hugging Face, you’d only need to modify one component rather than changing code throughout the notebook.
This modular approach makes debugging easier, as issues can be isolated to specific components rather than searching through intertwined code.
Detailed code walkthrough and function analysis
Now, let’s examine the actual code that makes this reasoning model work. The notebook contains several key functions, each handling specific aspects of the reasoning process.
ModelManager class: The central controller
This class is essentially the brain of our application. It handles everything related to model operations:
# Simplified pseudocode

class ModelManager:

def __init__(self):

self.model = None

self.tokenizer = None

# Initialize settings and logging

def load_model(self, model_name):

# Unload current model if any

# Load specified model using unsloth

# Set up for inference

def unload_current_model(self):

# Free memory and GPU resources
The ModelManager gives us a clean interface for handling complex model operations. It also includes memory management functionality – super important when working with large models on limited hardware.
The enhanced reasoning engine
The most fascinating part is the generate_with_replacements function. Here's what it does:
Takes user messages and conversation history
Processes them through the model to generate initial responses
Monitors for when the model tries to finish thinking too early
Injects additional thinking prompts when needed to extend reasoning
# Core reasoning pseudocode

def generate_with_replacements(message, history):

# Process user input

# Generate tokens progressively

# When model tries to conclude thinking too early:

# Insert additional prompts to extend reasoning

# Separate thinking process from final response
This function creates the "aha moment" by forcing the model to consider additional perspectives and nuances it might otherwise skip.
Parameter configuration
The update_global_params function controls how the reasoning process behaves:
def update_global_params(min_tokens, max_tokens, ...):

# Update global settings that control:

# - Minimum thinking depth

# - Maximum response length

# - Reasoning creativity (temperature)

# - Topic diversity (top_p)
These parameters let you fine-tune the reasoning process for different types of questions. Lower temperature values (0.1-0.3) create more focused, deterministic thinking, while higher values (0.7-1.0) encourage more creative exploration.
Theoretical pseudocode and conceptual framework
Let's step back and look at the conceptual model behind reasoning enhancement. Basically, this notebook implements what I call "forced extended thinking" – a technique that prevents language models from rushing to conclusions.
The core idea is remarkably simple: when the model tries to finish its thinking process prematurely, we inject additional prompts that force it to consider new angles. Here’s how that looks in simplified pseudocode:
Python ```
function EnhancedReasoning(user_query):

# Begin the standard thinking process

response = model.begin_thinking(user_query)

# Monitor token generation

while generating_response:

if model_attempts_to_conclude_thinking() AND thinking_depth < minimum_required:

# Force additional perspectives by injecting new prompts

# This creates the "aha moment" by extending reasoning

inject_prompt_from_product_thinking_library()

# Track thinking metrics

update_thinking_depth()

# Once sufficient thinking depth is reached

return {

"thinking_process": captured_thinking,

"final_response": final_output

}
```
The theoretical framework rests on three key principles:
Monitored Generation: The system carefully watches how tokens are generated, looking for patterns that signal premature conclusion
Depth Enforcement: When thinking is too shallow, the system intervenes by injecting specialized prompts
Dual Outputs: Unlike standard models that only show final answers, this approach exposes both the thinking process and conclusions
What makes this framework powerful is how it mimics human metacognition – our ability to reflect on our own thinking. The specialized prompts function as internal questions an expert might ask themselves: "Have I considered user impact? What about implementation tradeoffs?"
This approach creates a form of artificial metacognition, forcing the model to engage in deeper analysis before reaching conclusions.
The result is AI-assisted product thinking that’s more thorough and considers multiple dimensions of complex problems. Just look at the output below.
Overview of the application
Before we move on to the last section, here are some of the glimpses of the app. Once you execute the demo.launch(debug=True, share=True)command the app will start building.
You will get this message and a URL:
Colab notebook detected. This cell will run indefinitely so that you can see errors and logs. To turn off, set debug=False in launch().* Running on public URL:
https://452f6e4d6867d6d680.gradio.live
This share link expires in 72 hours. For free permanent hosting and GPU upgrades, run `gradio deploy` from the terminal in the working directory to deploy to Hugging Face Spaces (https://huggingface.co/spaces)
Upon clicking the URL, you will be redirected to the app page to choose a model.
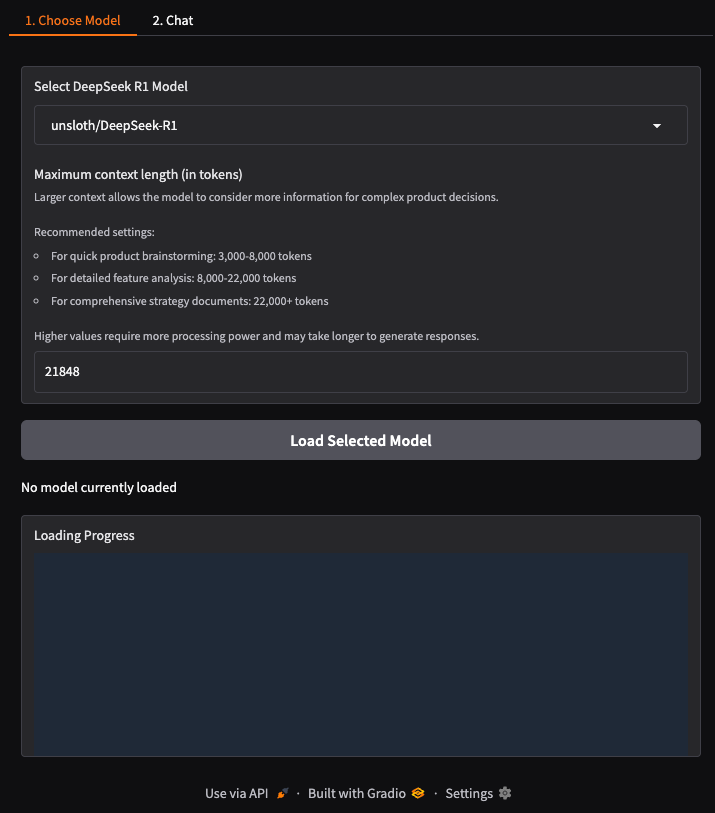
Select any DeepSeek model from the dropdown menu. In this case, I chose unsloth/DeepSeek-R1-Distill-Qwen-1.5B. It is small and works well with less resources.

Next, load the model. It will take some time to load. Be patient.

Once the model is loaded, you can use it for your use cases.

Best practices and implementation rationale
Looking at how this notebook is built, there are some really smart design choices that make it both technically sound and practical for real-world use.
First off, the code follows strong modular design principles. Notice how the ModelManager class encapsulates all the complex model operations? This isn't just about clean code—it directly affects how easily you can maintain and extend the system. If you want to swap in a different reasoning model later, you only need to modify one component.
Error handling is also impressively thorough. For example:
try:

# Model loading operations

yield "Success message", True

except Exception as e:

self.log_print(f"Error loading model: {str(e)}")

yield "Error message", False

finally:

# Clean up resources regardless of outcome
This approach prevents crashes and provides meaningful feedback when things go wrong—crucial when deploying to real users.
The memory management strategy deserves special attention too. AI models are resource-hungry, and the notebook implements several optimizations:
Explicit GPU memory cleanup after model unloading
Progressive token generation rather than all-at-once processing
Selective activation of model components through unsloth
These technical decisions translate directly to business benefits:
Faster iteration cycles: Clean separation of concerns means product teams can experiment with different prompting strategies without touching the underlying model code
Reduced operational costs: Memory optimizations allow running on less expensive hardware
Better user experience: Error resilience and real-time progress indicators create professional-feeling interactions
Future-proofing: The modular design accommodates new models and features with minimal rework
The implementation maintains balance between theoretical elegance and practical constraints—exactly what's needed in production AI systems.
Conclusion
Reasoning models represent a significant advancement in how AI can support product decision-making. By implementing the approach outlined in this guide, you gain AI assistants that don't just pattern-match – they think through problems methodically, considering multiple dimensions before reaching conclusions.
The technical implementation hinges on the concept of "forced extended thinking" – monitoring token generation and injecting additional prompts when thinking appears shallow. This creates a form of artificial metacognition that produces more thorough analysis than standard LLM responses.
For product teams, this translates to concrete advantages: reduced cognitive bias in decision-making, systematic exploration of edge cases, and balanced consideration of both technical constraints and user needs. AI engineers will appreciate the modular design pattern that simplifies maintenance and allows for easy model swapping.
Startup leaders should note the strategic implications – these systems help teams move beyond superficial analysis to deeper exploration of product decisions. By customizing parameters to match problem complexity, you can apply appropriate analytical depth to different decision types while maintaining reasonable costs through the optimizations described.
Acknowledgments
Special mention to the author of this notebook, “r1_overthinker.ipynb”, “qunash” who inspired me to write this article.